# Donate Widget
One time payments e-commerce donations.
# Introduction
Donate Widget is a solution that allows you to make a donation using the Verestro payment gateway that supports e-commerce payments. Solution can be integrated with Merchants, on their online store to provide a simple and easy way for its consumers to perform a donation to a charity of Merchant choice by simply adding them to the cart. Donate Widget designed by Verestro supports all key web-browsers (see further in the document) and has mobile responsive design. Also, it can be customized and localized per specific Customer or Country. The trial version available for interaction from end user point of view is available [here](https://rpm-front.upaidtest.pl/donate-ukraine)[.](https://rpm-front.upaidtest.pl/donate-ukraine)
## How to connect with us?
Verestro provides access to the solution via Web SDK. The Customer plugs in the JavaScript library received from Verestro, which allows the Customer's users to make donations. The plugged in SDK communicates with the Verestro backend which then communicates with the Acquirer. This is required that Customer has an account in Acquirer's system which settle his transactions.
### Web SDK
Verestro provides Software Development Kit (SDK) which will be used to process donation. This is JavaScript library which should be plugged in Customer application. Verestro team actively supports Customer with integration. More information about Web SDK can be found [here](https://bookstack.verestro.dev/books/donate-widget/page/technical-documentation). Verestro team actively supports Customer with integration. Depending on the requirements as to the appearance of the payment form, the Customer must provide appropriate graphics (such as Customer's Company logo) to be uploaded to the payment form by Verestro.
### Widget screenshot examples
An example of the donation form is presented below. All views included in the Donate Widget Solution are presented [here](https://bookstack.verestro.dev/books/donate-widget/page/use-cases#bkmrk-user-flow).[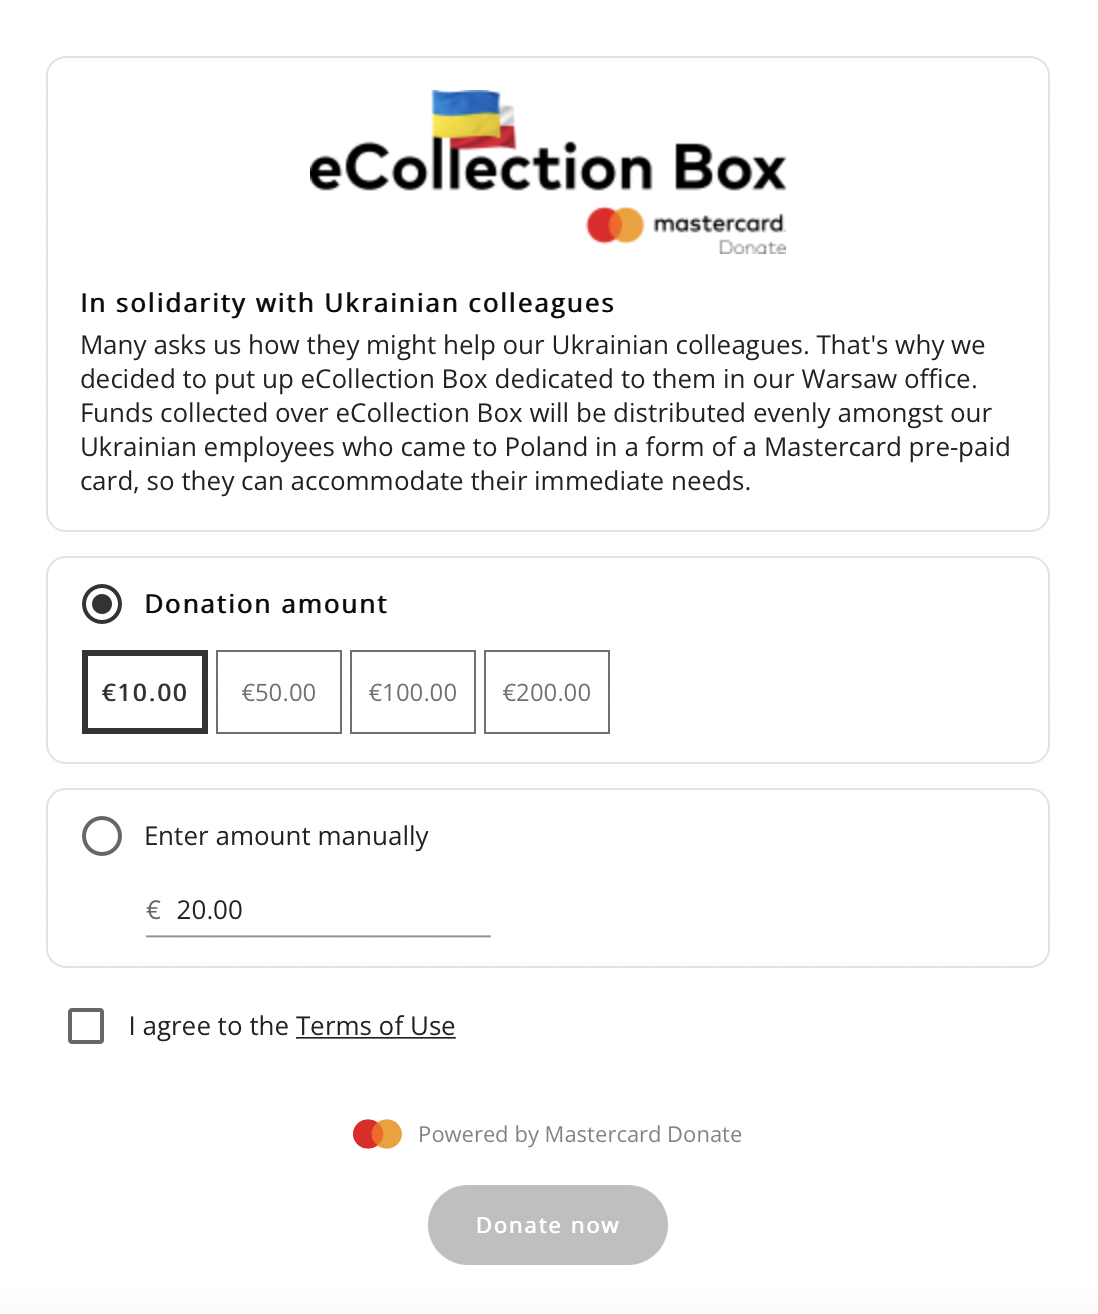](https://bookstack.verestro.dev/uploads/images/gallery/2022-07/image-1656856851386-00-00.png)
# Overview
This document provides high level description of functionalities offered by Donate Widget. Donate Widget supports e-commerce transactions, thus releasing Customer from the need to handle the transaction process on his side – the entire transaction process will be handled by Verestro. The tool is very easy to integrate because it requires to plug one library. The solution can be supported by various Acquirers. Note that if the Customer requires the settlement of the transaction by a new Acquirer – to which Verestro is not integrated – there will be required new integration between Verestro and the new Acquirer. The specification of the new Acquirer should be provided by the Customer.
## Abbreviations
Abbreviations and Acronyms used in the document:
| **Abbreviation**
| **Description**
|
| ACQ
| Acquiring Institution / Acquirer
|
| ACS
| Access Control Server
|
| SDK
| Software Development Kit
|
| Mid
| Merchant Identifier
|
| PCI DSS
| Payment Card Industry Data Security Standard
|
| PAN
| Permanent Account Number
|
| CVC
| Card Verification Code
|
| 3DS
| 3-D Secure
|
## Terminology
This section explains a meaning of key terms and concepts used in this document:
| **Abberations**
| **Description**
|
| Customer/Merchant
| Institution which uses Verestro products. This institution decides which solution should be used depending on the business requirements and how transaction should be processed.
|
| User
| End-User which uses Donate Widget Solution. It is root of entity tree. User is an owner of the card and is an entity that decides to pay for the purchase with the Donate Widget Solution, selecting it from the list of payment methods available on the Merchant (Customer) website.
|
| Card
| Card belongs to the user. If user intends to pay with the Donate Widget Solution, then has to insert required card's data to the appropriate fields shared by the Merchant Paytool solution. Card data will not be stored in the Verestro system. They will be provided to Acquirer.
|
| Acquirer
| External Institution resposible for processing transaction and 3ds requests ordered by the Donate Widget Solution. Acquirer connects with banks / card issuers and returns an information whether the ordered action on a given card is possible.
|
| MID
| Merchant identifier. This entity is represending Merchant in Acquirer's system. Customer has to provide the mid information to enable mid configuration in the Verestro system. Required to process transactions and 3DS via Verestro system.
|
| API Key
| Unique UUID value assigned to the Customer account in Donate Widget Backend. Using this value, the Donate Widget SDK is able to get all configuration data required to perform transaction process via Donate Widget Solution.
|
| PAN
| It is 7-16 digits of the credit/debit card number. These digits contain the Permanent Account Number assigned by the bank to uniquely identify the account holder. It is necessary to provide it when User wants to pay with a card for purchases on the internet.
|
| CVC
| It is a type of security code protecting against fraud in remote payments. Card Verification Code is necessary to provide it when User wants to pay with a card for purchases on the internet.
|
| Expiration Date
| It is a date of the card validity ending and contains two values – month/year. Card will be valid to the last day of the month of the year showed on it. It is necessary to provide it when User wants to pay with a card for purchases on the internet.
|
| 3DS
| 3-D Secure is a method of authorization of transaction made without the physical use of a card, used by payment organization. The 3DS process in the Donate Widget Solution is performed internally in the Verestro system.
|
| PCI DSS
| It is a security standard used in environments where the data of payment cardholders is processed. The standard covers meticulous data processing control and protection of users against violations.
|
## Donate Widget Key Components
This section provides introduction to technologies which are supported by Donate Widget Solution.
| **Component**
| **Description**
|
| Donate Widget Frontend
| Component containing the part of the solution which is displayed to the User. Basic information about the transaction shown such as the name of the Merchant (Customer), amount and currency, as well as inputs for card data.
|
| Donate Widget SDK
| Component containing all necessary scripts whether to perform communication between Donate Widget Frontend and Backend and the data exchanging between these two components. Donate Widget SDK should be included on the Customer website.
|
| Donate Widget Backend
| Component stores the configuration data of a given Customer such Merchant Name or Merchant Id and it is responsible for providing all necessary configurations to the Frontend. It also communicating with various Acquirers and triggers notifications to the Customer and the User (depending on the Customer requirements) about successful or unsuccessful transaction.
|
| Notification Service
| Component responsible for sending information to the Customer about the status of the transaction status. It is also responsible for sending email to the User about the transaction. Notification Service is triggered by Donate Widget Backend.
|
## Application Demo
The trial version available for viewing and interaction is available [here](https://rpm-front.upaidtest.pl/donate-ukraine).
# Onboarding
The onboarding process takes place mainly on Verestro side. In order to perform onboarding, the Customer has to provide some information needed to correctly configure him an account in Donate Widget Server. Configuration includes following information:
- Customer name – Basically, it's the name of the Customer's company. The following parameter will be displayed to the user in pay donation form – example appearance can be found [here](https://bookstack.verestro.dev/books/donate-widget/page/use-cases#bkmrk-user-flow).
- Description – Information about the purpose of the donation. The following parameter will be displayed to the user in pay donation form – example appearance can be found [here](https://bookstack.verestro.dev/books/donate-widget/page/use-cases#bkmrk-user-flow).
- Redirect URL’s - Those are the addresses to which user will be redirected after a successful or unsuccessful transaction. These parameters will be added to the Customers's account configuration.
- Postback URL - This is the address to which information about the donation will be send to the Customer. This parameter is not required if the Customer does not want to receive notifications regarding the donation - more detailed information about the postbacks can be found [here](https://bookstack.verestro.dev/books/donate-widget/page/technical-documentation#bkmrk-doda%C4%86-opis-metody-po).
- Notification to the User - It is a flag that defines whether e-mail notifications will be sent to the User. Such e-mail contains the donation status, donation identifier, date and amount.
- Term of use and privacy notes URL – addresses where the Customer stores above-mentioned documents.
- Customer's pictures – These are images that could be, for example, the Customer's logo. They will be posted as requested by Customer in the pay donation form and in the e-mail notification. This point is optional. If the Customer does not provide such pictures, the pay donation form will be shown with it's default appearance – example appearance can be found [here](https://bookstack.verestro.dev/books/donate-widget/page/use-cases#bkmrk-user-flow).
After creating an account for the Customer, Verestro provides all necessary data for Customer which allow to use the solution. Such data includes:
- api key – value that defines a Customer in the context of donation process offered by Verestro. The value api-key should be send by the Customer in every request - Verestro system maps the request with the proper Customer's account. Technical information about the api-key can be found [here](https://merchant-beta.upaidtest.pl/champion/docs/paytool.html#_sdk_methods).
- basic authorization - it is the login and password of the Customer account in the Verestro system. Basic authorization is needed if the Customer wants to download transaction data via the "[get transaction details](https://bookstack.verestro.dev/books/donate-widget/page/technical-documentation#bkmrk-get-transaction-deta)" method.
The Customer must also have to create an account in the Acquirer's system which settles transactions. Such an account is defined by the MID parameter (to find out what MID is, see the "[Terminology](https://bookstack.verestro.dev/books/donate-widget/page/overview#bkmrk-terminology)" chapter). This is a very important parameter as it is required for payment processing. This parameter, together with it's authorization data, can be provided to Verestro by the Customer. Verestro offers support in creating such an account if it has integration with a given Acquirer. If the client requires transactions to be processed with the participation of a new Acquirer, then Verestro must perform a new integration. The client is then responsible for providing the documentation that Verestro will use during the integration.
The solution allows to assign one terminal to Customer account. If the Customer wants to operate several terminals, it requires the creation of additional Customer accounts (account per terminal) or development on the Verestro side that will handle such a requirement.
# Use cases
Donate Widget is a solution for making cash donations. This functionality does not require any type of session or user account in the Verestro System. Donation is in fact one-time payment e-commerce transaction, therefore it is based on a form in which the user simply enters his card details. This chapter describes the business process from the user's point of view, extended by technical elements.
#### Donation process
The donation process in the Verestro system begins when user decides to make a donation while still on the Customer website. At this point, the transaction pre-initialization process takes place. 3D Secure process takes place fully on the Verestro side. The sequence diagram below shows the entire transaction process step by step. The diagram below shows a successful transaction process:
@startuml
skinparam ParticipantPadding 30
skinparam BoxPadding 30
skinparam noteFontColor #FFFFFF
skinparam noteBackgroundColor #1C1E3F
skinparam noteBorderColor #1C1E3F
skinparam noteBorderThickness 1
skinparam sequence {
ArrowColor #1C1E3F
ArrowFontColor #1C1E3F
ActorBorderColor #1C1E3F
ActorBackgroundColor #FFFFFF
ActorFontStyle bold
ParticipantBorderColor #1C1E3F
ParticipantBackgroundColor #1C1E3F
ParticipantFontColor #FFFFFF
ParticipantFontStyle bold
LifeLineBackgroundColor #1C1E3F
LifeLineBorderColor #1C1E3F
}
participant "Customer App (Browser)" as browser
participant "Donate Widget Frontend" as pfront
participant "Donate Widget SDK" as psdk
participant "Donate Widget Backend" as pback
participant "Customer Server" as custback
participant "Acquirer" as acq
note right of browser: User chooses "Pay with Merchant Paytool" (1)
browser->pfront
pfront->psdk: Begin transaction (2)
psdk->pback: Transaction preinitialize /preinit (3)
pback->pback: Store transaction session data (4)
pback->psdk: OK - returns transactionId (5)
psdk->pfront: Redirect with transactionId (6)
pfront->pback: Get transaction (from point 3) (7)
pback->pfront: Returns transaction details (8)
pfront->pfront: User filling data (CN, CVC, EXP) (9)
pfront->pfront: Encrypt data (from point 9) (10)
pfront->pback: Perform transaction /transaction/TRX\_ID + enc body (11)
pback->acq: Transaction with 3DS (12)
note left of acq: At this point 3D Secure process takes place
acq->pback: Response (13)
pback->pfront: Transaction Result (14)
pback->custback: Send postback to provided URL (15) (Optional - configurable)
pfront->browser: redirect User (success/failure) (16)
custback->pback: Get transaction status (17) (optional but hardly recommended in case when postbacks are disabled)
pback->custback: Return transaction status (18)
custback->browser: Provide transaction result (19)
@enduml
For easier understanding of the process, each of the steps listed in the diagram are described below:
1. The user which is using the Customer's application, selects the option of making the donation, providing amount and accepts terms of use.
2. The Customer application starts the transaction process by communicating with Donate Widget SDK.
3. Donate Widget SDK performs the transaction pre-initialization by making a request to Donate Widget Backend.
4. Donate Widget Backend creates an entry in the system about initiating the transaction and returns the unique id (in the form of UUID) of the transaction.
5. Donate Widget Backend returns transaction id to the Donate Widget SDK.
6. Donate Widget SDK redirects the user to a form in Donate Widget Frontend.
7. Donate Widget Frontend retrieves from the backend information about the created transaction (in point 4) using the previously obtained transaction id.
8. Donate Widget Backend returns transaction details to the Donate Widget Frontend.
9. The user fills in the form with card data and personal data and clicks “Confirm and Pay” button.
10. Donate Widget Frontend encrypts data with JWE standard.
11. Donate Widget Frontend makes a payment request (based on the previously received transaction id) to the Donate Widget Backend providing encrypted data collected from the user.
12. Donate Widget Backend makes transaction with 3D Secure request to the Acquirer.
13. Acquirer returns transaction with 3D Secure status.
14. Donate Widget Backend provide transaction status to Donate Widget Frontend.
15. Donate Widget Backend sends a postback about the completed transaction along with transaction status and a unique transaction id to the Customer Server (this step takes place if the Customer wants to use this option).
16. Donate Widget Frontend displays transaction status to the user and redirects him to the approciate site (redirect URL provided by the Customer).
17. Customer Server gets transaction details from Donate Widget Backend calling [get transaction details](https://bookstack.verestro.dev/books/donate-widget/page/technical-documentation#bkmrk-get-transaction-deta) method using transaction id (this step takes place if Customer wants to use this option).
18. Donate Widget Backend returns transaction details to the Customer Server.
**After the user completes the transaction, it is highly recommended that the Customer** **gets** **the transaction** **details from Donate Widget Backend** **(as shown in point 17 & 18 of the diagram above) or listen for postbacks (as shown in point 15 of the diagram above).**
#### User flow
This section describes each of the steps from end user point of view. Each of the steps is reflected in the pictures which are showing default application design.
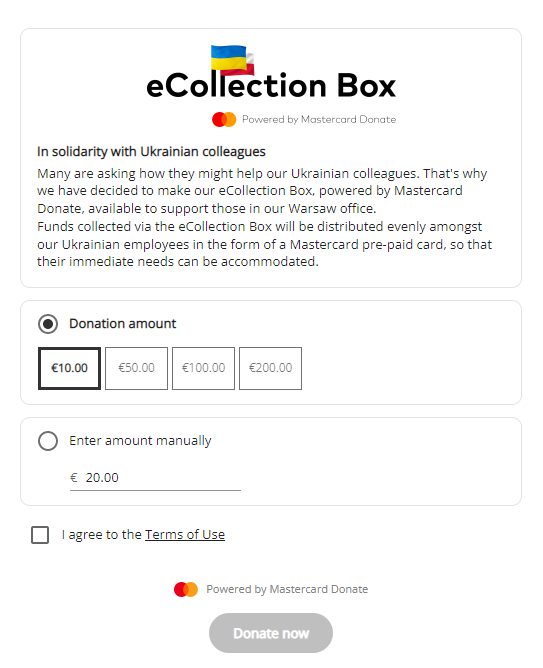
After the user selects the “make a donation” option, the redirection to a separate web page happens – hosted by Verestro – where the view for selecting the donation amount and accepting the terms of use appears:
The appearance of the donation form can be adapted to the expectations of the Customer, e.g. by adding his company's logo to the form.
| [](https://bookstack.verestro.dev/uploads/images/gallery/2022-07/image-1656932708108.png)
| [](https://bookstack.verestro.dev/uploads/images/gallery/2022-07/image-1656932679700.png)
|
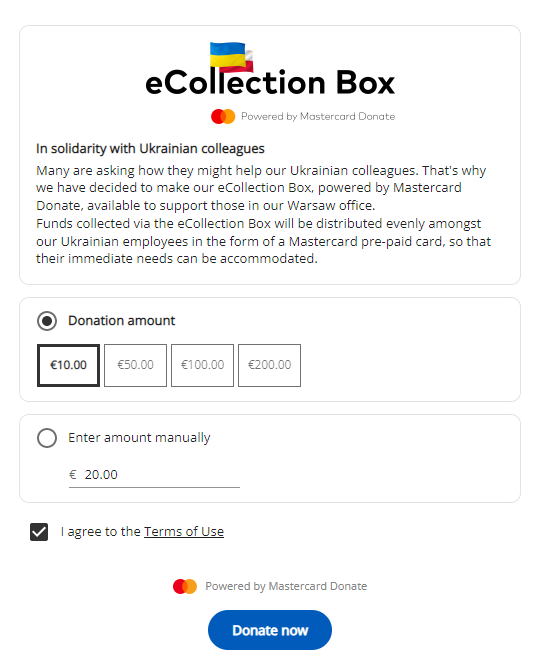
| The default grant amounts and the minimum grant amount are configurable. The "Donate" button remains inactive until the user selects the amount of the donation and accepts the terms of use (this button is responsible for ordering the donation). After filling in all the required fields with the data, the "Donate" button is unlocked.
|
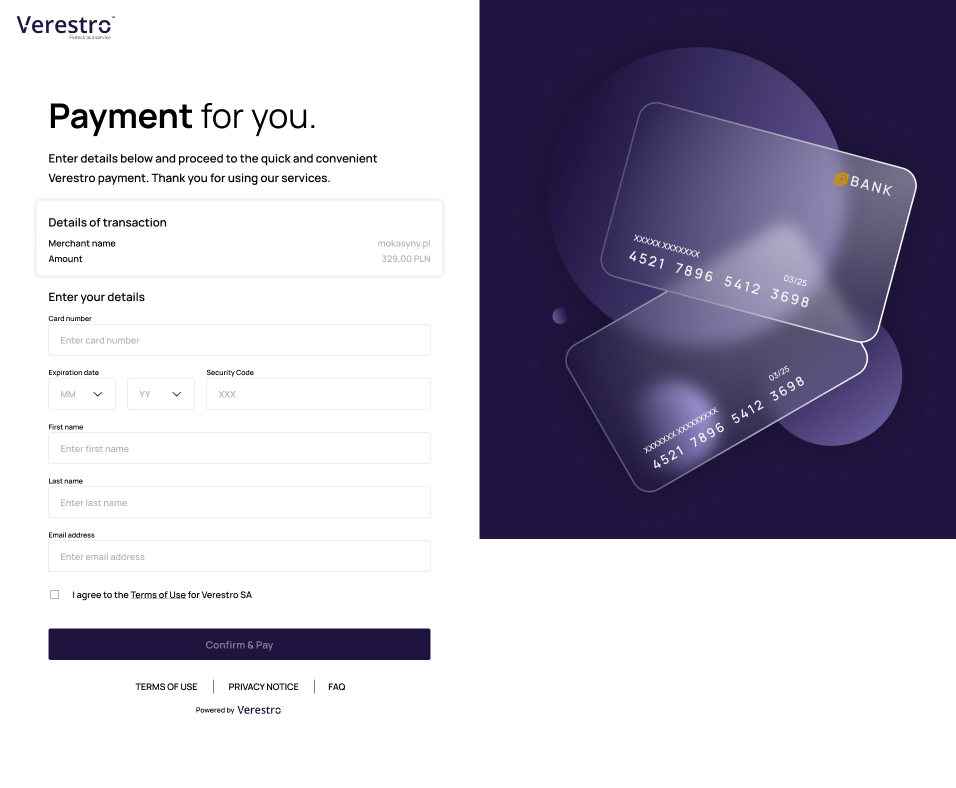
After clicking the "Donate" button, user will be redirected to the payment form - hosted by Verestro. Pictures and descriptions presented in the form example below are configurable depending on the needs of Customer a form for card data and personal data is displayed to the user. The picture below shows this form:
The appearance of the payment form can be adapted to the expectations of the Customer, e.g. by adding his company's logo to the form.
| [](https://bookstack.verestro.dev/uploads/images/gallery/2022-05/image-1651754546896.png)
|
| The user must fill in each of the fields with the appropiate data. Each parameter must meet the validation requirements, e.g. The card number must comply with the Luhn algorithm. The user must also confirm the acceptance of the terms of use. If the field's validation requirement is not met, the field is highlighted in red and the „Confirm and Pay” button remains inactive. The picture below shows a form with correctly filled data:
|
| [](https://bookstack.verestro.dev/uploads/images/gallery/2022-05/image-1651755384592.png)
|
| After pressing the "Confirm & Pay" button, the process of communication with the bank takes place. Upon its completion, the status of the transaction will be shown to the user. The pictures below show "success" and "fail" status view:
|
| [](https://bookstack.verestro.dev/uploads/images/gallery/2022-05/image-1651755895396.png)
| [](https://bookstack.verestro.dev/uploads/images/gallery/2022-05/image-1651755898629.png)
|
| Regardless of the transaction status, the user is redirected to the address provided by the Customer. The user can go to this address by clicking „Return to the shop” button or simply wait for an automatic redirection.
|
At the each stage, the user can view the “Term of use”, “Privacy notice”, “FAQ” by clicking approciate option as shown on the screen below:
[](https://bookstack.verestro.dev/uploads/images/gallery/2022-05/image-1651755975614.png)
# Technical documentation
## Overview
This chapter provides the instruction of the integration with the solution and with it's methods. Prior to using this solution the Customer have to proceed onboarding process. To create account please contact with support.
## Integration
This section describes how to integrate the solution using the SDK provided by Verestro. The merchant-paytool.js is a JavaScript-based client-side SDK. The SDK adds MerchantPayTool class to the global JavaScript scope which can be further instantiated to start Donate Widget’s payment process. Alternatively, it also defines a custom element called merchant-paytool for a more straightforward, plug-and-play solution.
An optional step is to send a transaction status notification to the Merchant Server. Details of the notification are described in the [postback](https://bookstack.verestro.dev/books/donate-widget/page/technical-documentation#bkmrk-doda%C4%86-opis-metody-po) section.
Additionally, the PayTool SDK provides a method that allows you to "[get transaction details](https://bookstack.verestro.dev/books/donate-widget/page/technical-documentation#bkmrk-get-transaction-deta)" using "*transactionId"* parameter.
### API Reference
Initialization Add the following script to your website:
**Test environment:**
```JavaScript
```
**Production environment:**
```JavaScript
```
The **type="module"** attribute is currently required, because the SDK utilizes modern JavaScript code splitting syntax.
### SDK Methods
| **init**
|
| (class approach only)
Starts PayTool's payment process using the provided data.
After successful initialization, resolves a promise and redirects to PayTool's website.
Rejects a promise if any error occurs.
|
| **Parameters**
|
| data
initData
|
| **Returns**
|
| Promise<void>
|
### Interfaces
Data object passed to PayTool's backend API.
| **initData**
|
| **Name**
| **Type**
| **Description**
|
| apiKey
| string
| Merchant identifier, given during onboarding.
|
| amount
| number
| Transaction amount in the lowest unit of money, fe. cents for USD.
|
| currency
| string
| Transaction currency code.
|
| description
| string
| Short description of transaction.
|
| redirectUrls
| object
| Optional return url object. If not provided, urls from merchant’s config will be used instead.PayTool might append additional query parameters to the urls, fe. a transaction identifier.
|
| redirectUrls.successUrl
| string
| The url where users will be redirected after a successful payment.
|
| redirectUrls.failureUrl
| string
| The url where users will be redirected after a failed payment.
|
### Examples
The SDK offers different ways to initialize a payment. It can do most of the heavy lifting by itself, including UI, but it also exposes a lower-end API to let you customize your UX.
### Class approach
Angular
```JavaScript
{
import { Component } from '@angular/core';
@Component({
selector: 'app-root',
template: '',
})
export class AppComponent {
payTool = new MerchantPayTool();
onClick() {
this.payTool
.init({
apiKey: 'YOUR_API_KEY',
amount: 9999,
currency: 'CURRENCY_CODE',
description: 'TRANSACTION_DESCRIPTION',
redirectUrls: {
successUrl: 'YOUR_SUCCESS_URL',
failureUrl: 'YOUR_FAILURE_URL'
}
})
.catch(console.log);
}
}
}
```
React
```JavaScript
export const App = () => {
const payTool = new MerchantPayTool();
return (
);
};
```
Plain JavaScript
```JavaScript
```
### Web component approach
This approach focuses on modern solutions to help your integrate with PayTool as fast as possible and keep your code clean, providing a pre-built "Click to Pay" button. The component accepts data as Init Data, similarly to the [init](https://merchant-beta.upaidtest.pl/champion/docs/paytool.html#init) method.
Angular
```JavaScript
import { Component } from '@angular/core';
@Component({
selector: 'app-root',
template: '',
})
export class AppComponent {
data = {
apiKey: 'YOUR_API_KEY',
amount: 9999,
currency: 'CURRENCY_CODE',
description: 'TRANSACTION_DESCRIPTION',
redirectUrls: {
successUrl: 'YOUR_SUCCESS_URL',
failureUrl: 'YOUR_FAILURE_URL',
},
};
}
```
React@^18
```JavaScript
export const App = () => {
return (
{
if (el) {
el.data = {
apiKey: 'YOUR_API_KEY',
amount: 9999,
currency: 'CURRENCY_CODE',
description: 'TRANSACTION_DESCRIPTION',
redirectUrls: {
successUrl: 'YOUR_SUCCESS_URL',
failureUrl: 'YOUR_FAILURE_URL'
}
};
}
}}
/>
);
};
```
React@experimental
```JavaScript
export const App = () => {
return (
);
};
```
Plain JavaScript
```JavaScript
export const App = () => {
return (
);
};
```
In case of questions regarding the integration, Verestro actively supports Customer in the implementation.
## Postbacks
This section describes the method that allows Customer to receive notifications after every donation made. If Customer wants to handle notifications after transactions Customer must create HTTP POST endpoint which will accept requests in format JSON. If this option is enabled, the Donate Widget API will send information about the donation made to the endpoint provided by the Customer.
This feature is optional but we strongly recommend using it. Without this method, the Customer will not receive any information whether the donation was successful or not.
| *POST site.customer.com/notifications* |
Request body:
```JSON
POST site.customer.com/notifications HTTP/1.1
Content-Type: application/json
Content-Length: 265
{
"transactionId": "3a1e9961-75bc-4279-8791-033c180fa239",
"status": "DEPOSITED",
"amount": 100,
"currency": "USD",
"description": "description"
}
```
| **Request fields:**
|
| **Type**
| **Value**
| **Constraints**
| **Description**
|
| transactionId
| String
| Required
| Unique Id of transaction.
|
| status
| String
| Required
| Transaction status. **AUTHORIZED**, **DEPOSITED**, **FAILED**, **UNKNOWN**,
**REFUNDED**, **REVERSED.**
|
| amount
| Number
| Required
| Amount for transaction (minor units of currency).
|
| currency
| String
| Required
| Currency of given amount.
|
| description
| String
| Required
| Simple description of transaction. |
Response status: HTTP/1.1 200 OK
Example cURL:
```JSON
$ curl 'https://site.customer.com/notifications' -i -u 'login:password' -X POST -H 'Content-Type: application/json' -d '{
"transactionId": "387cd038-fa39-40e1-a6ac-0d610b594787",
"status": "DEPOSITED",
"amount": 100,
"currency": "USD",
"description": "description",
}'
```
## Get transaction details
| ***GET \[base-url\]/transactions/{{transactionId}}***
|
Method allows getting transaction details using "*transactionId"*. Method is protected by BasicAuth of the Customer.
Request:
```JSON
GET /champion/transactions/cd670818-dfbe-44fc-8948-8fbf8992d8d3 HTTP/1.1
Authorization: Basic bG9naW46cGFzc3dvcmQ=
Content-Type: application/json
Host: merchant.upaid.pl
```
Response body:
*HTTP Response - SUCCESS:*
```JavaScript
HTTP/1.1 200 OK
Content-Type: application/json;charset=UTF-8
Content-Length: 211
{
"transactionId" : "cd670818-dfbe-44fc-8948-8fbf8992d8d3",
"amount" : 100,
"currency" : "PLN",
"description" : "description",
"bin" : "4442211",
"lastFourDigits" : "1234",
"status" : "DEPOSITED"
}
```
| **Response fields:**
|
| **Type**
| **Value**
| **Description**
|
| transactionId | String | Unique Id of transaction.
|
| amount | Number | Transaction amount in pennies.
|
| currency | String | Transaction currency.
|
| description | String | Transaction description.
|
| bin | String | Card bin.
|
| lastFourDigits | String | Card last four digits.
|
| status | String | Transaction Status. Possible values: DEPOSITED - transaction finished with success INITIALIZED\_3DS - transaction during processing FAILED - transaction failed.
|
*Example cURL:*
```JavaScript
$ curl 'https://merchant.upaid.pl/champion/transactions/cd670818-dfbe-44fc-8948-8fbf8992d8d3' -i -u 'login:password' -X GET \
-H 'Content-Type: application/json'
```